If you’ve touched more copier paper than you have trees lately, if you don’t remember the last time you looked down at your feet and saw dirt instead of concrete, and if you’ve wearily realized that your life firmly orbits around your cell phone, it’s time for you to go backpacking.
Escaping the modern world and turning your backpacking daydreams into reality, however, can seem daunting. The biggest hurdle, and the one that slows down far too many would-be explorers, is simply understanding what’s needed to have a successful trip. The good news is backpacking requires that you travel light, meaning you really don’t need many things, you just need the right things.
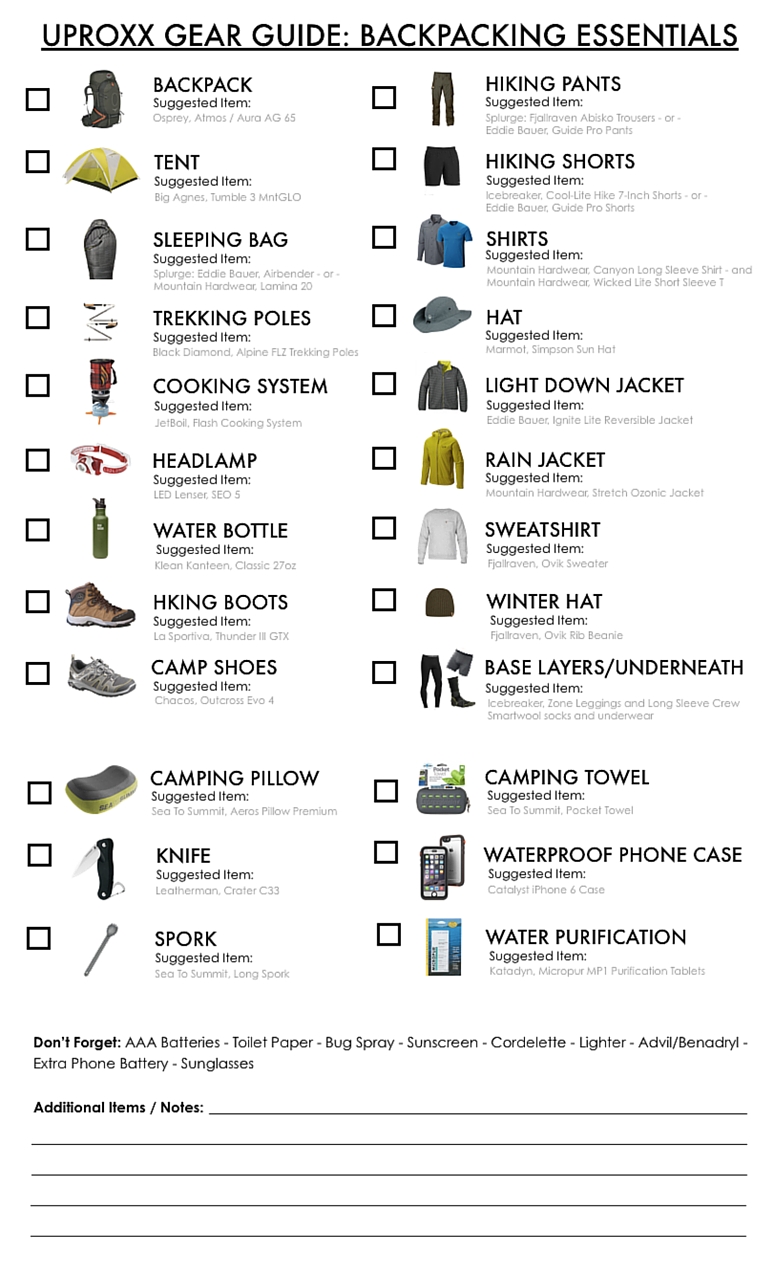
So to help eliminate this backpacking road block, we’ve created an easy to browse list of must-have items for your next backpacking trip (there’s even a shopping checklist at end that you can save and print out).
Before We Begin
- Let’s address money. Just like golfing, surfing, rock climbing, or countless other hobbies, backpacking requires that you invest in good equipment. And you should think of it as an investment — an investment in years of outdoor experiences and memories that can easily be attained once you own the gear you need to take part.
- But backpacking doesn’t have to break the bank. If you’re not in a rush, buy the gear you need over several months time and keep an eye out for both online sales (or lightly used secondhand items) and sales at your local sporting goods store or outdoor retailer, like REI.
- With that in mind, the items seen in this guide are top quality and mostly fall into the mid to mid-upper price range for similar items (the old adage you get what you pay for holds true when it comes to backpacking gear). And while you can’t go wrong with any of the suggested items below, feel free to use them as inspiration to find similar items that suit your respective budget.
- The specific items seen below have been personally tested by and come recommended by Uproxx. Testing included a trip by this guide’s author into Colorado’s Maroon Bells-Snowmass Wilderness — a 183,000-acre national wilderness area near Aspen.
- This guide (mainly the clothing section) focuses on gear best suited for use during the fall. But, really, the majority of the items seen here are for three-season use (spring, summer and fall). Of course, always check current and projected weather conditions before backpacking and adjust your gear and clothing accordingly.
1) Backpack
You can’t go backpacking without a backpack. And since it’ll hold every single one of your precious supplies, you’ll want to choose a high quality, comfortable one. First, you’ll need to know which size backpack to get. Most backpacks come in three sizes — small, medium and large — and your torso length will largely determine which size is best for you. While you could measure yourself at home with the help of a measuring tape and a friend, you’re best bet is to head to your local outdoor retailer and ask to be properly fitted.
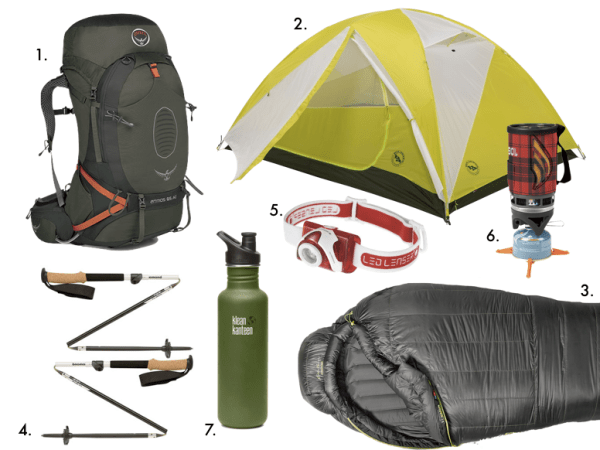
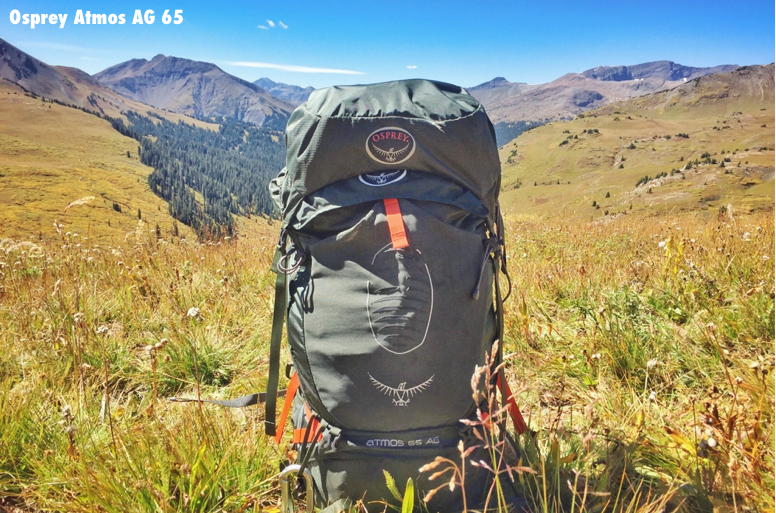
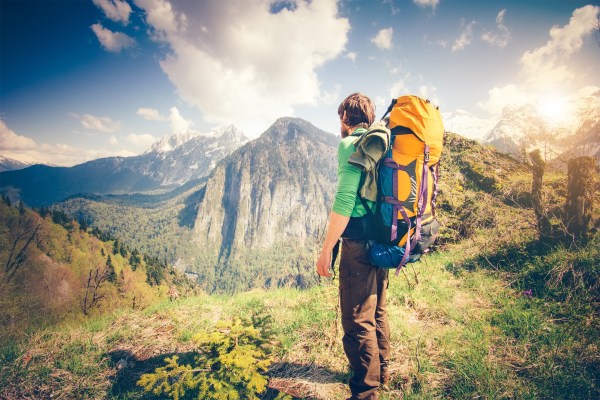
For a top of the line backpack, check out Osprey — a company that does one thing and does it well: making backpacks and rugged travel luggage. For my recent backpacking trip, I used the Osprey Atmos AG 65 (which comes in a 50 liter and 65 liter capacity, as well as a women’s version, the Aura AG). The pack features pockets and compression straps in all the right places, but the real reason to use this pack is its signature Anti-Gravity suspension system which perfectly distributes the pack’s weight and contours to your body. I knew I found the right pack as soon as I put it on, and my choice was confirmed during my trip when I meet a park ranger, a guy who backpacks miles and miles as part of his job, wearing the exact same pack as me.
And don’t forget, you’ll also need to pick up a hydration reservoir (the blue bag seen above), like the Osprey Hydraulics Reservoir 3 Liter. This’ll slip into a compartment in your backpack and provide easy accessibility to water while on the trail.
2) Tent
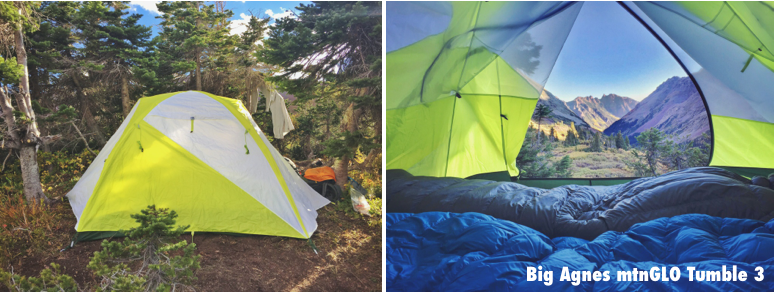
Yes, it’ll likely be one of the pricier items you’ll buy for your backpacking trip, but just think, once you own a tent, you’ll be able to go camping anytime, anyplace — nothing will hold you back. Remember, buying a tent suited for backpacking can be different than buying a tent for car camping. When buying a tent for backpacking, you’ll want to pay special attention to how much the tent weighs. Unfortunately, the lighter the tent often means the higher the price (lighter materials = more expensive materials). However, it is possible to find a perfect tent to fit all of your camping needs. Case in point, the Big Agnes Tumble 3 mtnGLO, a roomy and easy to set up three-person tent that’s light enough to take backpacking, but won’t break the bank (it also comes in one and two-person models).
As part of Big Anges’ mtnGLO collection, the Tumble features a strand of AAA battery-powered LED lights fully integrated into the seams at the peak of the tent’s interior which provide an even, ambient light. These little lights, which have two settings, 100% power and 50% power, are surprisingly helpful and ideal for organizing your pack, playing cards or just getting settled for bed — no more blinding your tentmates with your headlamp while trying to see in your dark tent.
Extra: If you want a tent that’s even lighter, and don’t mind spend a little more money, check out the Big Agnes Rattlesnake mtnGLO (which comes in one, two and three-person versions) and the Copper Spur mtnGLO (which comes in two and three-person versions).
3) Sleeping Bag / Sleeping Pad
You’ll want to focus on three things when buying a quality backpacking sleeping bag: warmth rating, weight, and compressibility. If you’re looking to buy one bag for three-season use, it’s a good idea to look for a sleeping bag rated for use at a minimum temperature of 15 or 20 degrees Fahrenheit. And since you’ll be carrying your sleeping bag in your backpack, you’ll also want a sleeping bag that is light (to help cut down on your total pack weight) and compressible (to help save space).
With this in mind, you’ll now need to choose between buying a bag filled with down feathers or synthetic materials. Down bags are known for being warmer, lighter and more compressible than synthetic bags — which almost always makes them more expensive. But if you’re ready to splurge on the best of the best and a bag that’ll last you for the next 20 years, invest in Eddie Bauer’s Airbender 20. With 850 down (i.e. the highest rating down can have), it’s the Rolls Royce of sleeping bags and the first ever to feature an inflatable sleeping pad built directly into the bag.
But if your camping budget is more modest, don’t worry, there are great less-pricey sleeping bags out there. Check out the Lamina 20 from Mountain Hardwear, an advanced synthetic bag that is light, warm and compressible.
Don’t Forget: Once you find the right bag for you, you’ll need a sleeping pad (unless you’re using the Airbender mentioned above). You can’t go wrong with any of the sleeping pads made by Big Agnes — like their self-inflating Two Track.
Sleeping Bag Extras:
Liner – If you buy a sleeping bag at a rating of 15 or 20 degrees, but plan to camp in conditions near or below those temperatures, or if you just get cold easily when you sleep, buy a sleeping bag liner like Sea to Summit’s Thermolite Reactor Compact Plus Liner. It’ll add an extra 20 degrees Fahrenheit to your bag’s temperature rating.
Compression Sack – Check to see if your sleeping bag comes with a compression sack, an important tool that’ll compress your bag down to a size that’ll fit in your backpack. If you find yourself in need, pick up a Ultra-Sil Compression Sack from Sea to Summit. It’s waterproof, so even if you and your backpack take a tumble in a river, your sleeping bag will stay dry.
4) Trekking Poles
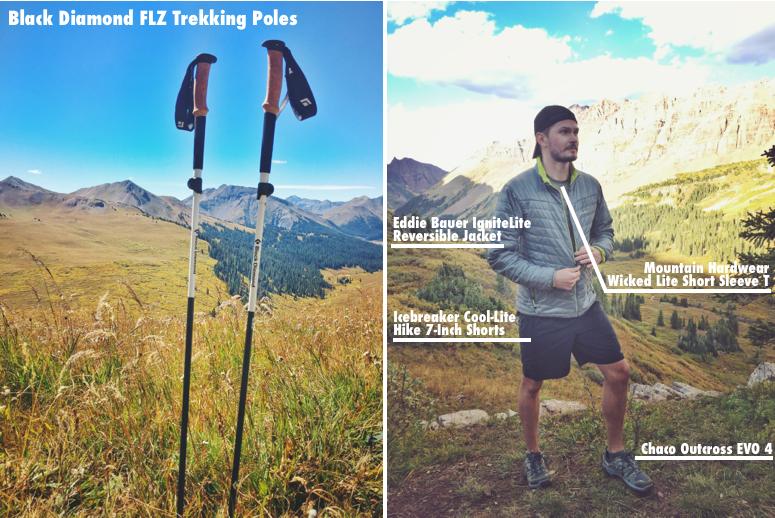
Using trekking poles can help distribute some of the weight you’re carrying off of your legs, provide enhanced balance while traversing uneven areas (and with 20 to 30-some-odd pounds on your back, your balance can easily be thrown off), provide extra support and propulsion while climbing steep trails, and provide extra stopping power while going downhill. For all of these reasons, I was infinitely glad I had Black Diamond FLZ Trekking Poles with me during my recent backpacking trip. They fold down into a packable size, feature a comfortable cork grip, and can also be used for winter ski touring by swapping out the included baskets (the black circular piece near the bottom of each pole).
5) Head Lamp
Whether you’re hiking at night, hanging out around your campsite after dark, or searching for something in your tent (if you don’t have a mtnGLO tent with built in lights), you do not want to forget a headlamp. And while you could go top-of-the-line and spend $330 on the LED Lenser XEO 19R, which packs a whopping 2000 lumens (i.e. an extremely bright output), for most backpackers, a headlamp in the 160-220 lumen range will provide more than enough light (and cost much, much less). I used the 180 lumen LED Lenser SEO 5, which runs on AAA batteries and features a swivel head to direct the light up or down to where you want it, as well as a red LED light which can be used to help preserve your night vision.
[Editor’s Note: I actually use the LED Lenser XEO 19R myself. It’s pricey, but it’s also flat-out incredible. There’s enough light to night-ski by, or night mountain bike by, or enough to lead a night hike with an inexperienced group. It’s a toy, sure, but because I really like hiking on abandoned trails, it’s a toy that feels very worth it to me.]
6) Cooking System
Unlike car camping, which allows you to bring pots, pans and coolers full of food, backpacking requires you keep you cooking tools and your meal preparation simple. But that doesn’t mean the meals you eat while in the backcountry can’t be good. First, get yourself a Jet Boil Flash Cooking System, a nifty and compact tool that’ll quickly boil a few cups of water. Second, get familiar with freezer bag cooking recipes, which only require the addition of boiling water to create an amazing meal (like, probably tastier than the meals you normally eat at home).
7) Water Bottle
While you’re not wearing you backpack (when you can easily drink from your pack’s water reservoir), you’ll want to have a water bottle on hand. There are countless bottles out there to choose from, but I always use a light, BPA-free, stainless steel Klean Kanteen Classic 27 oz. water bottle. With its wide mouth, it’s easy to fill up in a river or stream (see “water purification” below) and pour water from into my Jet Boil.
1) Hiking Boots
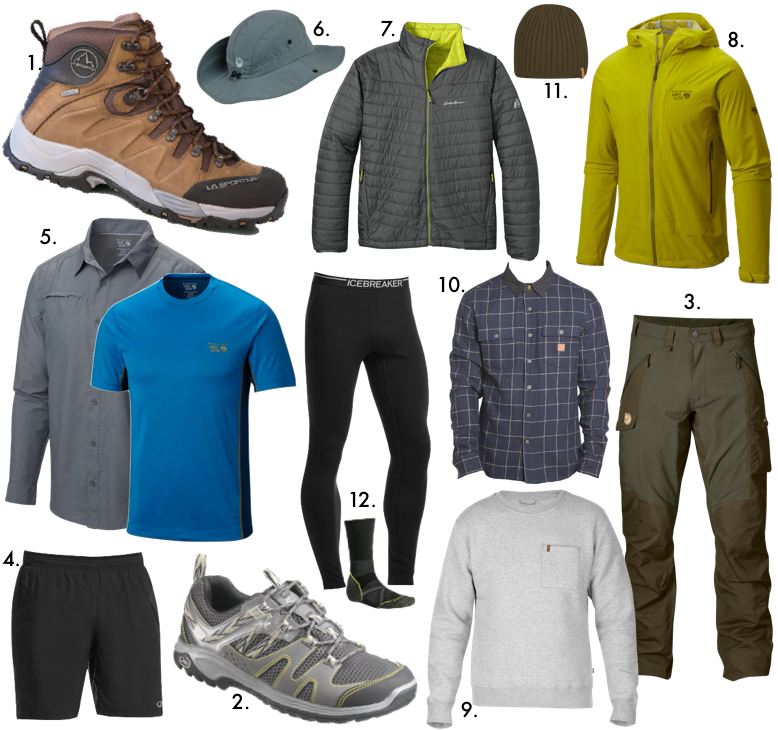
The foundation of any successful backpacking trip is good hiking boots. You’ll want to make sure your boots have a ridged and tough bottom (so you don’t feel pointy rocks when you step on them) and a solid toe and heel cap (to provide structure and prevent stubbed toes). How high your boot comes up your leg (or whether you’d prefer a hiking shoes instead of boots) is a matter of personal preference and the difficulty of your hike. But chances are, when you’re carrying a large backpack and traversing uneven trails, you’ll want something that comes up above your ankle and provides plenty of support. That’s why I wear La Sportiva’s Thunder III GTX, a sturdy and supportive waterproof boot ideally suited for hiking rugged terrain with a moderate backpacking load.
2) Camp Shoes
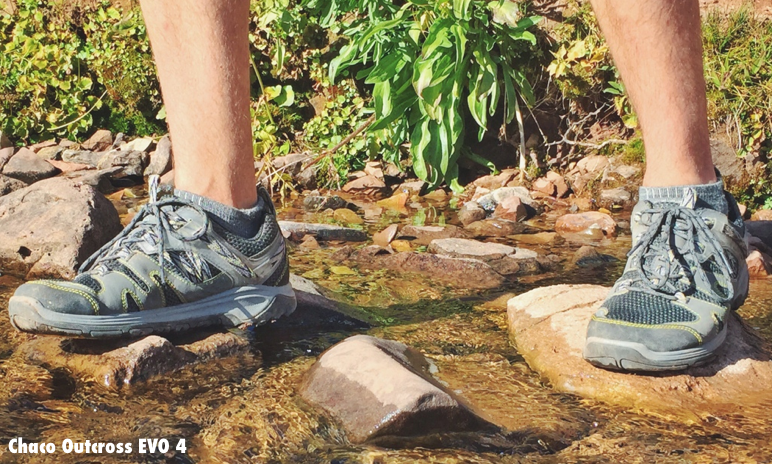
You’ll want to pack an extra pair of shoes for two primary reasons. First, to use as camp shoes — shoes you can put on while setting up and kicking around your campsite to relax your feet and give your hiking boots a break. Second, if you meet a stream or river that requires you get your feet wet to cross it, you can take off your boots and cross the river in these shoes. Or if one of your hiking boots gets soaking wet (like one of mine did when I slipped off a rock and dunked it in a river), you’ll have a second pair of dry shoes to carry on in. So, you’ll not only want shoes that are comfortable and sturdy for activities around camp (like finding firewood), you’ll also want shoes that are durable enough to hike in should the need arise, and, too, that dry out quickly should they get wet. Luckily, I had the perfect shoes that handled everything nature threw at them with flying colors — Chaco’s OutCross Evo 4. Trust me, you’ll want to have a pair of these shoes with you.
3) Hiking Pants
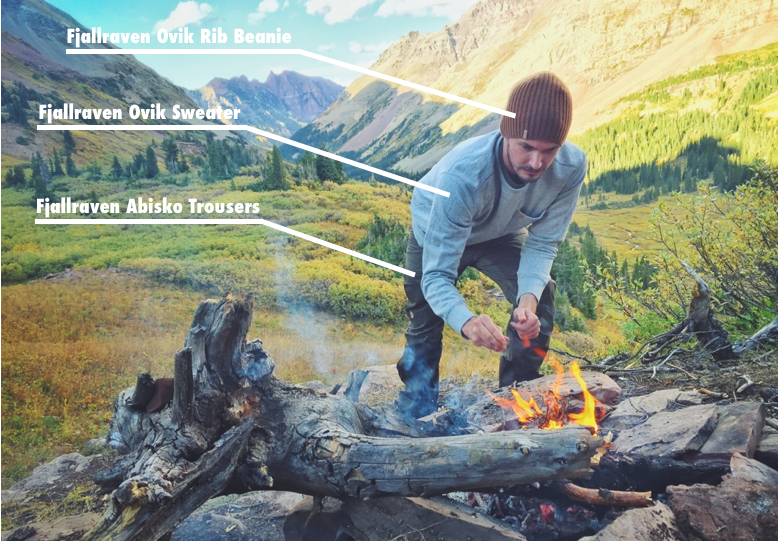
Buying a pair of pants specifically designed for hiking and backpacking is a must. And if you’re looking to splurge on the ultimate backpacking pants, get yourself a pair of Fjallraven’s Abisko Trousers. Super tough and durable, these pants have two zippered air vents on each leg to help keep you cool, are reinforced at the knees and rear so sitting down in the dirt at your campsite won’t be an issue, and just generally feel indestructible. Or for a more streamlined option at a more affordable price point, check out Eddie Bauer’s Guide Pro Pants.
4) Hiking Shorts
During cooler months, while at higher elevations, or while traversing certain trails or terrain, pants may be the right choice. But when conditions get hot, or when you just want to cool off and relax while setting up your camp, you’ll be grateful to have a pair of shorts to change into. For the lightest possible shorts that can also double as a bathing suit should you find a lake or river to take a dip in, Icebreaker’s Cool-Lite Strike 7-Inch Shorts can’t be beat. With their built-in liner (so underwear isn’t required), they’re so light, breathable and quick drying, you’ll feel like you aren’t wearing anything at all. Or for a traditional hiking short that offers more structure and coverage, go with Eddie Bauer’s Guide Pro Shorts. They’re water and sun repellent, and feature deep front pockets and zippered side pocket for storing on-the-trail essentials.
5) Hiking Shirts
Just like with pants and shorts, you should buy shirts that are designed for hiking. I prefer and recommend packing one athletic t-shirt and one traditional hiking button-up shirt. You’ll be working up a sweat while hiking in these, so make sure to buy shirts that are well ventilated and excellent at wicking moisture. To fit this criteria, I wear Mountain Hardwear’s Wicked Lite Short Sleeve T, which really is wicked light at just 4.2 ounces (not to mention insanely ventilated and made from fabric with 15 UPF protection), and their Canyon Long Sleeve Shirt, which fits fantastically, is light and soft to the touch, never wrinkles and features 30 UPF protection.
6) Hiking Hat
Granted you could just wear a baseball hat, but when exposed to the sun on an open trail, it’s nice to have a wide-brimmed hat to help keep you shaded and cool (although looking cool in a hat like this isn’t really possible). For a breathable option with 45 UPF protection, go with Marmot’s Simpson Sun Hat. I especially appreciated the buttons on the side that allow you to button up the hat’s brim when you don’t need it (but again, looking cool is tough).
7) Light Down Jacket
A light down jacket is an absolute must for any outdoorsman or woman. These versatile jackets help block wind and keep you warm without adding weight to your pack. Countless outdoor brands make jackets in this style, but I wear Eddie Bauer’s IgniteLite Reversible Jacket. It features a high visibility color on the inside (if you need to be seen) and weighs just 10.56 ounces. I wear mine all the time — whether I’m on the trail, in a helicopter, or just walking around town.
8) Rain Jacket
Even if the weather forecast for your time in the backcountry doesn’t call for rain, it’s still a good idea to have a rain jacket in your pack (make sure you bring one that’s waterproof, not just water resistant). And if it doesn’t rain, you can use it to help protect against wind and to add a light layer of warmth. My rain jacket of choice: Mountain Hardwear’s Stretch Ozonic Jacket. It’s ultra waterproof yet breathable (an issue with many waterproof jackets) and weight just 9.7 ounces, so there is zero excuse not to bring it along.
9) Sweatshirt
After a hard day backpacking what can seem like countless miles, few things are better than taking off your backpacking clothes made from technologically advanced materials and putting on a good old fashioned, comfy, cotton sweatshirt to make you feel human again and remind you of the comforts of home. Fjallraven’s Ovik Sweater makes me feel happy inside when I’m in the woods.
10) Flannel Shirt
While hiking in the early mornings or late evenings when temperatures are especially cool, a flannel shirt can come in handy. And when you get to camp and want to feel cozy as the sun sets, that same flannel will save the day yet again. Roak Revival’s Nordsman Flannel, made of poly wool flannel, or Icebreaker’s Lodge Long Sleeve Flannel, made of 100% Merino wool flannel, will do the trick.
11) Winter Hat
While your summer backpacking trips likely won’t require one (unless you’re backpacking at a high elevation), you’ll want a warm winter hat for cold mornings and nights during your spring and fall trips into the backcountry. While any old hat will do, I wear a Fjallraven Ovik Rib Beanie — it’s made of wool and looks great both on and off the trail (a win-win).
12) Underneath
Although it’s last on the list, base layers, socks and underwear are some the most overlooked yet most important backpacking essentials. While sleeping, in the mornings and in the evenings when temperatures are cool (or below freezing, like they were during my recent backpacking trip), you’ll want a snug and warm bottom and top base layer. For that, I wear Icebreaker’s Zone Leggings and Zone Long Sleeve Crew. Both are made from ultra-high quality Merino wool (hence their higher price tag) and come in a variety of weights rated for different temperatures (but their 200 rating should do the trick for most three-season backpacking trips).
For under your base layer and/or under your shorts or pants, you’ll want a good pair of underwear with a close to the skin fit — like Smartwool’s jersey knit Micro NTS 150 Boxer Brief (they have a cut for women, too). And perhaps most important, are good socks. And I mean really good socks (here of all places, don’t skimp). Go with the durable SmartWool PhD Outdoor Medium Crew Socks for when you’re wearing your hiking boots and the SmartWool PhD Outdoor Light Micro Socks for when you’re wearing your camp shoes — your feet will thank you.
1) Camping Pillow
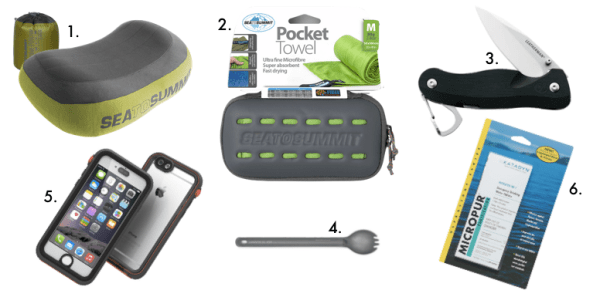
Sure you could make a pillow out of rolled up clothes, but with how surprisingly light, compact and comfortable Sea to Summit’s Aeros Pillow Premium is, you’d be crazy not to bring it along.
2) Camping Towel
Before going backpacking, you should just commit to being dirty and smelly, it’s part of the fun. But if you must get clean, there’s no better towel than the light and soft, microfiber Pocket Towel from Sea To Summit.
3) Knife
It’s always a good idea to carry a knife while backpacking. You may never need to use it, but it’s a tool you’ll want to have around just in case. Try the Crater C33 from Leatherman. And for another handy tool, or rather 29 tools in one, check out the wearable Leatherman Tread. This badass looking bracelet packs a serious punch with a cutting hook, bottle opener, and flat screwdriver amongst the tools hidden in the Tread’s steel links.
4) Spork
To eat your freezer bag meals cooked with the boiling water from your Jet Boil (mentioned above), the only utensil you’ll need is a spork, like the Long Spork from Sea To Summit. And if your seeing a theme develop, yes, Sea To Summit is kind of a one-stop-shop for the best campings odds and ends.
5) Waterproof Cell Phone Case
A good waterproof phone case can be a serious life saver while backpacking. Aside from protecting your precious phone from water (say, while crossing a river), it’ll also protect your phone from dirt and being dropped on the ground. I use the iPhone 6 case from Catalyst.
6) Water Purification
There are several ways to purify water on the trail, including using filtration pumps, UV light (like SteriPen) and filtration bottles (like Grayl). But the lightest and perhaps easiest method is with chlorine dioxide Micropur tablets. Chlorine dioxide is the same chemical used to treat municipal water supplies and when added to the water your gather from a stream, river or lake, will kill viruses, bacteria, and Giardia in 30 minutes.
And Don’t Forget: Toilet paper, AAA batteries, bug spray (depending on where you’re camping and time of year, you may not need it), sunscreen, lighter, sunglasses, cordelette (thin but strong rope that came come in handy and put to various uses), Benadryl/Advil, and an extra phone battery.
And of course, if you’re going into the backcountry, a compass, GPS, safety flares, and maps are all wise choices.

