Ah, brisket, you finicky beast. There’s something about a super tough piece of red meat that’s cut with plenty of fat that deserves a spot in every home cook’s repertoire. It’s comfort food taken up to eleven… when done right. If you nail it, all that moist muscle and luscious fat come together perfectly.
Below is my recipe for a killer brisket that you can make at home. You don’t need a huge backyard smoker. You don’t need to stay up through the night, spritzing the meat like an obsessed hairdresser wetting someone’s hair over and over again to get it ‘just right.’ You only need a few kitchen tools and time.
For this recipe you’re going to need a sous vide machine or stick. This may have seemed liked an insurmountably expensive get before. Don’t sweat this one. Sous vide sticks that attach to stock pots are cheap these days — under 100 bucks cheap. You’ll also need a handheld smoker. I use this one. It only set me back 30 bucks and does a great job. Beyond those two tools, you just need some seasoning, grease proof paper and foil, oh, and, a great piece of meat.
THE MEAT
I generally go to a butcher for my meat needs. That way I can get exactly the cut I’m going to need. But don’t let that stop from hitting your local grocery store. Just be aware of what you’re buying. And try, at all costs, to avoid factory meats.
For a brisket for a family of four with enough leftover for a couple sandwiches during the week, I generally stick to two-to-three pound piece. Half should be lean with a fat cap and half should be lean with large streaks of fat throughout. That way you get a bit of a balance and option when serving. Some people love the streaking fat section, others adore the lean.
I take the meat out of the fridge at least an hour before I start to seasoning. It’s best if the meat is already room temp — or at least moving in that direction before you start.
THE SEASONING
Keep the seasoning simple. This isn’t a corned beef so don’t try reinventing the wheel. I use cracked black peppercorns, rough sea salt, and saltpeter. That’s it. If you’re having trouble snagging some saltpeter, try Amazon.
I use a pestle and mortar to do a very rough grind on about two tablespoons of black peppercorns. I add in about two tablespoons each of sea salt and saltpeter and mix it together into a rub.
Take some paper towels and pat dry the meat as much as you can. The more fluid that’s on the surface of the meat, the more the seasoning is going to run off. Then massage in all the seasoning mix you made. Rub that shit in well. You want the whole piece of meat covered on every side. Lastly, place your brisket into a one-gallon zip lock bag.
Smoke
If you don’t have a handheld smoker, skip this part and let your brisket rest for at least an hour so the magic of the seasonings can do its trick. Otherwise, let’s get some smoke on.
I use a hickory bowl to smoke the meat. Basically, close the zip lock bag around the smoke barrel so you can fill the bag fast without too much smoke leaking. Pop on your smoker, light that bowl, and fill the bag. You will get smoke blowback, so maybe open a window.
I let the smoke settle into the meat for a good hour. The bag should start out completely filled with smoke to the point you can’t see what’s inside. After an hour or so, the smoke will have soaked into the meat and dissipated. The meat should have a very, very dark red hue at this point.
THE COOK
While the smoke is settling into your meat, set up the sous vide. I use 155F in a tall, deep, and narrow chaffing dish. Once the meat is smoked and the sous vide is up to temp, throw in your bag. Make sure to use the water displacement method to get all the air out of your bag before zipping closed. That is, force the air out of the bag with a wooden spoon while it goes into the water.
I wrap some foil over the top to help lower the evaporation rate of the water and then set a timer for 30 hours and walk away.
I do check on the water about halfway through. Sometimes it needs a little topping up. Warm tap water does the trick and the sous vide gets it up to temp in no time.
THE FINISH
The next day, you have an almost perfect brisket on the way. Two things are important now. One, you need to finish the meat with a nice crisp sear. Two, you need to save all that amazing liquid that’s come out of the meat for gravy or au jus. I’ll leave what to do with the jus up to you.
Sear
People like to use a torch to sear off meat. I find that that’s okay with a small surface area like a steak. But when it comes to large roasts, the taste of the butane inevitably starts to impart into the meat. And that’s not great.
Instead, use your oven. I set mine to gas mark 8, its highest setting. That’s about 450F. Get that oven piping hot. I place the brisket on a rack in a roasting pan — fat cap up — and put it in the oven for about 30-ish minutes. This will vary on the type of oven you have. Mine is an old gas oven, so it’s a little slower.
What you want to do here is use your nose and ears. You’ll start to hear the fat of the brisket crackle and pop. This means you’re on the right track. Try not to open the oven to check on the brisket too often. This will lose a lot of heat and progress on the sear.
After those 30-ish minutes, you should be hearing pretty constant fat crackling and smell fat rendering in the bottom of the roasting pan. Time to take that sucker out.
Rest
This step gets skipped far too often. Always rest your meat. I wrap up my brisket in some greaseproof paper and wrap that in plenty of heavy-duty foil.
Then you let it sit for 30 minutes to an hour. All that steam and moisture will sit inside the meat, adding an extra layer of texture and beauty to the meat. Patience is the name of the game here. The colors will deepen. The flavors will deepen. Everything about this piece gets better when you rest it for a spell.
SERVE
Roughly 34 hours after you started, you’re ready to serve. Unwrap that brisket like it’s Christmas morning and you’ve been waiting all year for that new BMX!
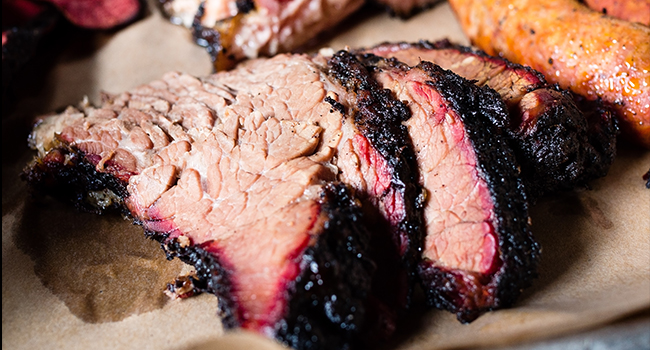
I slice the brisket against the grain and into about 1/4 inch slices. You want thin here. There should be plenty of pink inside the meat from the addition of saltpeter to the seasoning mix. Expect a lot of big umami, pepper, savory, and fat flavors roasted deeply into the meat.
The lean side should have a thin fat cap. The meat is shockingly moist and tender with just a hint of velvety fat under a crunchy cap.
The streaked fatty side is like a wonderland of meaty flavors in every bite. The unctuous inner fat melts with the fall-apart tender lean and the crunch of the fat cap for a perfect textural bite. The salt and pepper add a simple, yet refined seasoning that doesn’t overpower any of the brisket. It’s a perfect balance of fat, lean, and seasoning.
Your guests will not leave hungry.


